While it's really fun to shop for school supplies and purchase new clothing, school itself can be very stressful. If you've read my prior post, you know that I have a newfound love for coloring books. They are great for stress relief, making them perfect for the school year.
Plus, they're great for after you've finished tests or assignments!
I decided to combine my love of coloring with my love of school supplies to create binder covers with coloring pages. You can find templates on the internet for this sort of thing, but this is a way to make it your own.
Materials
-Printer (with copy function)
-Computer
-Coloring book (optional)
-Binder(s) (w/ pocket front)
Steps
 1. Pick out your coloring page. You can print them out from a website if you'd like, but I used my printer to make a copy of pages from my Disney coloring book. If you're copying, you may need to trim the sides of the picture as sometimes the binding of the book casts a shadow. I left the shadow for one of mine because I liked the effect, but for the other one I cut it off.
2. Estimate the size of your heading. Because we are printing on normal 8x11 paper, chances are it won't cover the entire binder. To solve this, simply place a second piece of blank paper underneath to extend the length. Don't worry if there's a blank white strip, this will be the place for the heading.
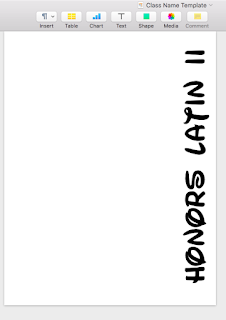
3. In a blank document, type the name of the class into a text box. Then, rotate the box so it's 90º. Once you do this, you can move it to the left or right of the page (depending on where you put your blank strip). The size of the text will depend on the thickness of your strip.
 |
| Because both pages are white, it's hard to see where one stops and the other starts |
4. Print out the page with your heading and slip the paper underneath your coloring page, replacing the blank page you used as a guide. It should now be the length of the binder.
5. Slip pages underneath the clear front pocket of your binder (if you haven't done so already).
And here's the finished product:
I went with a Disney theme, but you can do whatever you'd like. I also found fonts that matched the photo. The font on the AP Bio binder is bold Lithos Pro (a font used in Animal Kingdom), and the Latin binder is Waltograph.
The best part about these is that you can color them throughout the year or change them if you get bored.
Happy Back to School! ✏️


